Feather Weave Mist – Blue Replacement Slats

Feather Weave Mist – Blue Replacement Slats

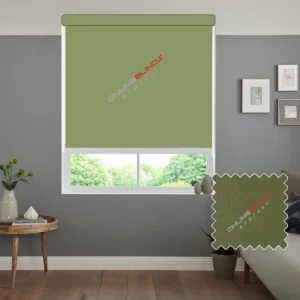
This misty blue vertical blind has a soft and calming look that works beautifully in many different rooms and can easily blend with a wide range of décor styles.

The Finer Details

  • Fully made to measure
  • 100% polyester
  • Maximum drop: 4000mm
  • Minimum drop: 254mm
  • Louvres are 89mm wide and made from polyester fabric
  • Supplied with white top hangers. Bottom weights and stabilising chains are available in other colours, with white included as standard.

Product Imagery

Please note that colours may look slightly different on screen depending on the type and settings of your monitor. To be certain of the shade, you can request a free sample before making your order.

Returns

These blinds are classed as custom-made products. They can only be returned if found to be faulty. Please make sure the measurements you provide are accurate before placing your order.

 1.09


Total Price:  1.09

A slat-only measurement refers to the length of the vertical blind fabric laid flat. The standard slat width is usually 89mm, which is the most common size and the one used for most fabrics.

When ordering, check that the fabric chosen is the correct width. (Measure to the nearest centimetre for both height and width. Do not make any deductions yourself.)

If slats are not available, follow this guide:

  • Measure the size you need for your window.
  • Measure from the track opening down to the point where you want the slat to finish.
  • The slat should stop around 13mm above any obstacle such as a window sill or radiator.

Counting and Ordering Slats

  • Count the number of existing slats or the number of carriers on your headrail.
  • Enter the total quantity required when placing your order.

Before fitting, make sure you have the following items included with your vertical blind:

Extra tools and parts required for installation:

  • 2 top fix brackets
  • 2 face fix brackets
  • 1 set of hangers
  • 1 Allen key
  • 2 stabilising chains
  • 1 safety hook
  • 4 wood screws
  • 1 weight
  • A pencil
  • Screws
  • A drill with the correct bits
  • A crosshead screwdriver
  • A metal tape measure

Face Fix

  • Position the brackets about 5cm from each end of where the headrail will sit. If more than two brackets are supplied, fit the extras evenly along the length of the blind.
  • Ensure that the fixings are suitable for the wall or surface where the brackets will be mounted.
  • Hook the back of the headrail into the bracket, rotate it into place, and secure it by tightening the small screw at the front of the bracket.

Top Fix

  • Measure and mark the distance carefully, leaving space for any obstacles such as window handles that extend into the recess.
  • Place the brackets around 10cm from each end of the headrail position to allow clearance for the handle. If more than two brackets are provided, fit the extras at equal spacing along the blind.
  • Make sure the fixings are appropriate for the ceiling or surface where you are mounting the brackets.
  • Tilt and hook the headrail into the bracket, then rotate it until it clicks securely into place. To remove the headrail, press the bracket at the release point.